Introducing Inkflow 3: With Inkport

by qrayon 22. July 2013 18:49

Inkflow-banner-325x504

We built Inkflow to make visual thinking easier, to bring the ease of pen and paper into the iPad age. The thing is, even we still find ourselves using pen and paper a lot. It’s hard to give up our Moleskine notebooks and G2 pens. How can we use both paper and iPad better together?

Inkport: Copy and Paste from the Real World

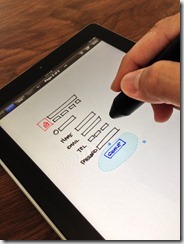
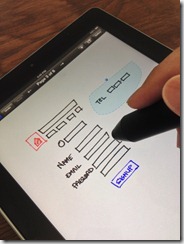
Inkflow Plus v3 includes a powerful new feature called Inkport. Inkport uses the iPad’s camera to scan high-resolution images of your written notes and instantly converts them into Inkflow’s native vector ink. Once on your iPad, you can edit, rotate, resize and rearrange things as if you had drawn them in Inkflow.

Inkport lets you go from paper to iPad without missing a beat.
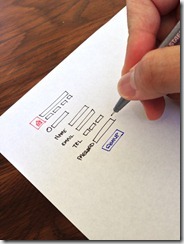
Inkport paperInkport iPadInkport edited

Check out this video of Inkport in action:


Think across boundaries. See a shape or pattern in a book you like? Use Inkport to pull it into Inkflow and incorporate it into your designs. Easily combine notes and drawings from different notebooks.

Inkport works well across a variety of handwritten and printed media, and is optimized for dark inks on light colored paper. Like to think in color? No problem, Inkport works with colored inks too.

We’re pretty sure Inkport is going to change the way you use pen and paper in your workflow. What used to require scanning in your notes, then spending minutes tweaking filters in Photoshop can now be done instantly, right on your iPad. Spend more time on your ideas, not on your tools.

More Creature Comforts

Inkflow 3 also includes a slew of interface and feature enhancements that make it even easier to use. You can now directly access your .inkflow files via iTunes. iPad users also get an adjustable wrist guard, and the ability to set text style defaults.

For those of you who have upgraded to Inkflow Plus, thank you so much! In addition to Inkport, we’re adding the ability to rotate photos in Inkflow 3, with a cool new rotation snap feature. Also, by popular request, is a new menu option to flip ink.

Let’s look at these additional features in a little more detail:

iTunes File Sharing

For those of you with a lot of Inkflow books, iTunes File Sharing is a powerful way to manage your files directly. To access your books, open iTunes, select your device, then click on Inkflow in the Apps tab. Each book is stored in it’s own .inkflow file. You can copy these books to your Mac for backing up, or to another iPad, iPhone, or iPod Touch with Inkflow installed.
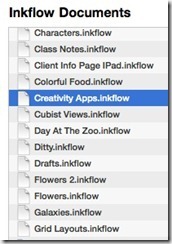
iTunes-File-Sharing_thumb

Tip: You can even access your files wirelessly using WiFi syncing in iTunes.

Wrist Guard (iPad)

A number of you guys have asked for a dedicated wrist guard for the iPad. In Inkflow 3, you’ve now got one. Our design challenge was to add an easy-to-use wrist guard without cluttering up the interface or being too distracting. Here’s what we came up with:

You’ll notice a new faint gray tab at the lower right of your screen. Pull it up to show the wrist guard. Drag it up and down to adjust the wrist guard height. You can also tap on the tab to quickly toggle the wrist guard display.

Wrist-guard-tab_thumb

For folks who don’t want to use the wrist guard, and would prefer a little less on-screen clutter, you can disable it in the settings menu from the Gallery.

Text Defaults (iPad)

Tired of changing from left-aligned 48pt Helvetica Regular? The text editor toolbar has a new option to set the default font style. Set up any combination of font, font-weight, alignment, size, and color you want, then tap on the new Favorite Style button (with the star icon), and select “Set As Default Style”. All newly added text will have this style.

You can also change the currently edited text’s style to match the current default with the second option: “Reset to Default Style”. This is also a handy way to quickly copy the style from one text box to another.

Text-defaults_thumb

Photo Rotation with Rotation Snap (Inkflow Plus)

We have been planning on adding the ability to rotate photos for a while, but wanted to get the interaction design just right. There are some interesting subtleties about rotating images: You generally want to rotate images at regular, compass-point, increments… Except when you don’t. You also want to be able to straighten images that are slightly off center. We could have added an extra menu option to do this, but thought long and hard about how to combine the two operations. The outcome is, what we think, a unique rotation snap tool:

Rotating images is easy enough, just select one or more images, including ink if you like, and drag the round rotation grip as before. What’s new is that you’ll notice 8 or more round snap guides appear around the circumference of rotation. Dragging near to these guides to snap to the 8 compass points. You can also drag your finger farther away to rotate to an arbitrary angle. Ink and photos now rotate together, so you can easily keep your annotations pinned to your photos when rotating.

If you select an image that has been rotated to an arbitrary angle, you will see an additional snap point that will snap that image back to it’s original, upright rotation. This lets you easily straighten images without an extra piece of UI.

Rotation-Snap_thumb

Flip Ink (Inkflow Plus)

Inkflow’s signature selection tool has always allowed you to easily scale and stretch ink. One limitation until now has been you couldn’t create a mirror image of the selected ink. We have actually been thinking long and hard about this. We originally tested the ability to skew ink in reverse, i.e. to stretch it into a mirror image. That is a pretty cool interaction, but the problem is that it takes too much space to snap the image into an exact mirror image.

We finally settled on adding a context menu option to quickly flip ink horizontally in place. To use it, just select some ink, tap on the selection, then select “Flip Ink”:
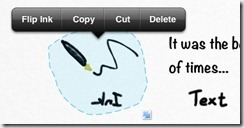
Flip-ink_thumb

How about flipping ink vertically? No problem, just flip it horizontally, then use the rotation snap feature to turn it 180 degrees. These two new features work really well together. You can now easily create repeating patterns and tessellation effects of your work.

Making Thinking Just a Little Easier

Inkflow’s goal continues to be the best tool for visual thinking. Even as features like Inkport blur the lines between analog and digital, we have worked hard to capture the freeform essence of writing on paper, but updated for the digital world. What makes writing on paper a wonderful experience is how unrestricted and unencumbered it is. While we continue to add features and adjustments to Inkflow, way beyond what pen and paper can do, we are being very careful not to detract from this kind of experience.

Inkflow Plus v3: Free for All Existing Plus Users

At some point in the future, we will probably have to release a paid upgrade to a new codebase, but for now, we really like providing these major updates for free. It’s a way to thank you guys who have already upgraded.

There’s a raging debate about how independent developers should charge for major updates. The truth is, we go back and forth on this issue a lot. On one hand, the single paid upgrade is simple and clean. No need to worry about buying additional features one-by-one or being “nickel and dimed”. The problem is that it’s hard to keep the lights on if all you do is issue free updates. :) That is, unless your user base keeps growing.

The magic economics of free upgrades work when you genuinely love our Apps and tell other people about them. We really, really appreciate all the tweets and blogs you guys have written. It means a great deal to hear about someone enjoying our Apps, and it really helps us in a real and tangible way. It’s win-win all the way.

So if you enjoy these new upgrades, please consider taking a minute to rate us in the App Store (each version gets a separate rating). Also, please do tell your friends and colleagues about us.

Thanks, and stay creative!

Which Stylus to Buy?

by qrayon 22. July 2013 10:47

stylii

We’ve been asked a few times to recommend a good stylus. We did a quick survey, and here are the ones that are most popular around here:

1. The Cosmonaut. This is probably the coolest and most unorthodox of the bunch. It's a thick marker-like stylus that doesn't look very wieldy, but it turns out to be quite comfortable for illustration and writing on the iPad. The shape makes you use it more like a whiteboard marker, which may be more appropriate for the iPad, as you tend not to rest your palm on the screen as much.

2. Bamboo. This is one of the better pen-like styluses. It has a narrower tip than most. It is closest in weight/feel to a standard pen.

3. Boxwave. This is the most inexpensive stylus of the lot, but it works great. It’s shorter than most, which also makes it more portable.

4. Adonit Jot. This stylus has a hard tip, which allows for a finer level of precision. However, the downside is it makes a fairly loud tapping sound each time you write.


If you just a need a stylus for casual use, the Boxwave is a good economical choice. However, if you tend to write or draw on your iPad for more than a few minutes at a time, as we do, it’s worth investing in a stylus that fits you best.

How To Change the Background in Vittle

by qrayon 16. July 2013 11:53

Vittle banner 325x50

Use the Lock-Image feature in Vittle to use any image as the background for your projects. Here’s how:

1. Insert the image you want to use as the background.

2. Tip: You can copy images from external Apps such as Mail, Safari, or Dropbox and paste them into Vittle.

Copy from Dropbox

3. Resize the image to fill the screen, then tap on it and select “Lock Image”.

Lock Image


You can now draw over the image and move things around without affecting the locked image. To unlock an image, simply tap on it again then tap “Unlock Image”.

You can quickly create multiple pages with your background image. Tap on the Page Number at the bottom, and tap the Duplicate Page button multiple times:

Duplicate pages


Bonus: Grid Paper Templates

To get you started, here are three grid templates that you can use as backgrounds:

1. Numbered Grid

2. Numbered Grid with Positive values

3. Un-numbered Grid

You can create your own in any graphics program, even using Keynote or PowerPoint. Here is the PowerPoint file for these templates.

We hope you’ll find this useful in your projects.

Vittle’s 720p HD Letterboxing

by qrayon 12. May 2013 16:25

Vittle banner 325x50

Vittle produces letterboxed (actually pillar-boxed) 720p HD videos, with black bars on the sides. There's an interesting reason for this: It turns out that YouTube and other services will only enable the HD option if your video is 720p (1280x720 pixels) or higher. 720p is also a 16:9 ratio, and of course the iPad's screen has a 4:3 ratio.

YouTube 720p Letterbox

In designing Vittle, we considered the following options:
1. Stretch the visible canvas from 4:3 to fill 16:9. This will cause distortion.
2. Letterbox the 4:3 content with black bars
3. Fit a 16:9 canvas in 4:3, which would lead to a smaller (20% shorter) effective canvas for writing on.
4. Only show 4:3 on the iPad, but actually record more of the canvas for 16:9 (making the viewport harder to control).
5. Record in the iPad's native aspect ratio, but then HD won't work in YouTube.

We picked option 2 as the one we think most people will prefer. This allows a perfect 1:1 mapping of the image you see on your iPad and the pixels in the generated video, so there are no surprises. This also enables fast native recording, avoiding a lengthy video processing step.

What do you guys think of the pillar-boxes? Is there another option you would much prefer? Please let us know. If enough folks need it, we’ll consider adding an option for other output sizes.

Cropping with iMovie

In the meantime, if you absolutely must remove the black bars or wish to stretch your video to fill the screen, iMovie for the Mac does have a handy crop feature. This Apple support document describes how. Your favorite movie editing tool on other platforms probably has a similar feature.


Thanks for your feedback! Hope you guys are enjoying Vittle!

Three Simple Ways to Practice Video Storytelling

by qrayon 4. May 2013 16:59

Video is fast becoming an important medium for our business and everyday communication. You can describe things more clearly and in a more engaging way using video and simple drawings than with just text.

This is a short guide to help you get started using video and leveraging it in your own work.

I'm going to be working through the three exercises using Vittle on my iPad (you can download the free edition from the App Store here), but you can use any recording device you want, even your iPad or iPhone's camera.

You can also start practicing by recording audio-only first, then add the visuals later.


1. Exercise 1: Describe a Recent Trip
Pick one photo from a recent vacation or trip and pretend you are describing being there to a close friend or family member.

Here's one from a trip we made to the Jefferson Memorial in Washington D.C. last Fall:


If you are like me, you are probably going to find yourself getting some points out of order when you try this for the first time. That's ok. Remembering a scene from the past tends to be non-linear. You are trying to put your memories into a coherent structure. As you speak, you will likely remember additional details that you want to add in.

What's nice about video is you can easily record multiple takes, and that's the first secret to making great videos: Multiple takes. Your audience doesn't care how many takes you did, since they only see the last one.


2. Exercise 2: Your Living Room Layout
For this exercise, you are going to sketch out the layout of your living room, and describe it to someone such as an interior designer.

Here's my description:

In this exercise, we had to be a little more exact, to combine facts like sizes with subjective descriptions. Notice how even a crude and simple drawing helps convey the information more accurately. Imagine how difficult it would be to have to describe that same room using only text.


3. Exercise 3: Refueling a Car
Now, for something a little more complex: Pretend you are describing how to fill up a car to someone who has never done that before, as if to a teenager. This lets you practice describing something you are probably very familiar with already.

Here's the description I came up with:

Notice that this was a little more involved than describing the static layout of your living room. The quality of the sketch is not important here. The goal is to convey a piece of complex information quickly and efficiently.

Simple drawings help a lot to convey the relative locations of things and their operation. Certain elements are easier to show with a quick sketch, while other points are easier to simply narrate.

Next Steps

Ok, hopefully these three simple exercises have helped you warm up your video-storytelling skills. You can easily apply these techniques the next time you need to explain your business to a customer, or get a point across to your colleagues.

Please let us know what you think. You can send us feedback through our website.

Happy video-making!

Five Reasons Why Video Is the Future of Communication

by qrayon 4. May 2013 16:49

You may prefer to watch the video of this post instead of just reading it:


Humans are naturally audio-visual creatures. We are born with an instinct to parse our world through sight and sound. Yet it takes years of training to learn written language, which are essentially shortcuts to our visual vocabulary.

Writing is a marvelous invention, but its role is destined to become more narrow and specialized in the future. At the same time, the role of video in everyday communication is going to dramatically increase. Here are five reasons why:

1. Video is Far More Engaging than Text

We much prefer to consume video over text. Just compare the number of movies you’ve watched over the last year to the number of books you’ve read. The reason is simple: A well crafted video can concentrate the experience of reading a long book into a much shorter amount of time. Video can also deliver a level of impact that a book cannot, simply because it engages more of our senses at once.

2. Our Attention Spans are Getting Shorter

It’s not our fault, there is simply so much more media to consume these days. As a result, video’s ability to deliver more information in a shorter amount of time is going to win out in the long run.

The other interesting feature of video is that it is easier to consume passively. You can watch a video lecture or news program while eating dinner, and easily absorb most of the content without and trouble. With a smartphone, you can also consume video from pretty much anywhere.

This passive nature also means that people are more likely to consume your information through video when they are tired after a long day's work.

3. Video Production is Now Free, Actually it's Better than Free

If you bought a smartphone anytime in the last 3 years, you already have an entire video production studio right in your pocket. Couple that with free online services like YouTube and Vimeo, and you now have the broadcast capability that rivals even the biggest movie studios.

These days, you can even earn a portion of advertising revenue from the videos you post online. What was once inconceivable is now trivial. Just ask all the folks who make cat videos.

4. Your Customers and Colleagues are Going to Expect Video

Look at the example of video lectures. They once used to be a backup in case you missed the actual class. They are now fast becoming commonplace and actually preferred over live lectures. The idea of “flipping” a classroom is quickly catching on in schools across the globe: Where students watch their lectures at home, and spend their valuable time in class working on problems with their teacher’s personal supervision.

In business, we are right now crossing a tipping point where video is going to become the norm. Once enough websites have a video introduction, all websites are going to have them, just to stay competitive. Once someone in the office realizes they can more effectively spread their great idea with a video instead of another long email, everyone is going to expect it.

So why wait? You can be the one to lead your organization through this transition, instead of having to play catch up later.

5. Video is More Human

None of us have any trouble engaging in a conversation with a friend or colleague. This is after all, the core of what it means to be human. So why do many of us struggle with so called “formal” writing? Try reading a typical business email or website out loud. Why do they sound so impersonal and even somewhat alien?

The reason is that it’s hard to convey your exact meaning or mood in writing. As a result, we are forced to err on the side of caution. We don’t want to give the wrong impression or accidentally alienate someone. So we avoid being too casual, or appearing uncertain about things, of being too human in our writing.

Video changes this. We can now communicate in our natural way again. This is not only more authentic, which our audience already expects, but it can be far more accurate and precise.

What Can You Do Today?

Start by practicing recordings of everyday topics you are already familiar with. Here are three simple exercises you can try, check them out. I'm sure that before long you will be connecting with your audience in a more meaningful way. The extra bonus is that recording videos can also be a lot of fun, and even liberating.

I hope you found this post useful. Please send us any comments or feedback you might have through our website. We really love hearing from you guys.

Thanks a lot.

Introducing Vittle: Write a Video as Easily as Email

by qrayon 4. May 2013 16:24

Vittle banner 325x50

Ever since the iPad came out, we have been busy trying to figure out what the Killer App for it is.

We think we’ve finally found it.

When you look at in person communication, at the office or at school, a lot of it is done in front of a whiteboard. A whiteboard lets you draw and speak at the same time. This is both more engaging, and much more flexible than doing either alone. When you explain something to someone on a whiteboard, it comes across as more free-flowing and natural. It doesn’t feel as scripted and rigid as using slides.

Vittle captures that same experience on your iPad, and makes it even better.

It lets your record anything you write and say into a video that you can instantly share with anyone. Here’s a 1-minute video describing Vittle, made with Vittle:


Download Vittle here.

Communicate Naturally

Vittle is built on our proprietary Inkflow Engine and gives you a large canvas to write and draw on. Zoom and pan anytime with two fingers. Unlike a real whiteboard, you can resize and move anything on the page. Don’t worry about running out of space. You can also drop in photos, and import PDF documents, including PDF slide decks from Keynote or PowerPoint.

Vittle is great for both quick, impromptu communications as well as for more formal presentations. Have you ever wanted to describe a quick sketch for someone when they weren’t in their office? Well, you can now email them a Vittle right from your iPad. E.g. annotate a screenshot of your website and show exactly what changes you want done.

Have you noticed the proliferation of those whiteboard-style introductions on websites? With Vittle, you can now create your own to promote your own product or idea. If you are a teacher, you can now easily create a library of video lessons that you can reuse year-after-year. Even create your own YouTube channel to share your expertise with the world.

Vittle can also be used just for fun. Create simple stop-motion animations; tell stories with comic characters and photos; storyboard your next movie production, in video. This is a medium that’s bound to spur new art forms.


Welcome to the Age of Digital Video

We are now approaching a tipping point where video communication is going to become ubiquitous. Bandwidth is now cheap and fast enough to handle video with no problem, even on mobile devices. Free services such as YouTube and Vimeo give you the broadcast reach that rivals any major movie studio.

As a result, we can now communicate in ways that are more natural and authentic to us as humans, rather than ways that are optimized for computers from the last century.

The iPad is ideally suited for this form of communication.


Vittle Snaps Right Into Your Workflow

Vittle produces native 720p HD video files that you own. We don’t force you to upload them to any online service, but you can easily share them on the service of your choice, email them just to the folks you want, or save them securely to your company servers. Videos are ready to share the moment you stop recording.

Vittle includes everything you need to record and share videos, and can even handle multiple scenes/recordings. However, you can also easily import the videos you create in Vittle into the editor of your choice. Use iMovie on your iPad to add themes and music, or pull the files onto your PC to compose your weekly video podcast. These days, a lot of basic editing can be done online. E.g. both YouTube and Vimeo let you add theme music to your videos.


Ok, Go Check Out Vittle Now

Download the Free Edition of Vittle if you want to try it out first. When you are ready for more, upgrade to the Full Edition. You can find out more about the two editions on the Vittle homepage.


Please Tell Us What You Think!

We are just at the beginning of discovering whole new ways of expressing ourselves using the medium of digital video. Let us know what you are doing with Vittle. If you post your videos online, just add the hash tag #vittle in your video description to make it easier for us and others to discover.

Feel free to drop us a line anytime, via our feedback page or through Twitter.

We can’t wait to see what you’ll do with Vittle.

Have fun!

Book Review: The Sketchnote Handbook by Mike Rohde

by qrayon 4. May 2013 11:33

Sketchnote Handbook

Sketchnotes are notes taken in real time while listening to a lecture, talk, or presentation. They incorporate both typography/words and pictures to capture the speaker’s main points. Sketchnotes can help you stay more engaged during a lecture, and are more fun than just taking written notes. The completed sketchnote also serves as a visual map of the talk for later.

The Sketchnote Handbook is easy to read, and is full of inspiring examples of different styles of sketchnotes. The book mainly covers techniques using pen and paper, but they can also be applied to digital tools. For example, the tip on different writing patterns to fill a page is useful, although if you are using Inkflow you can easily change patterns mid-stream. There’s a section at the end with exercises to practice drawing people, objects, and lettering.

Make sure to pick up the Video Edition of the book. This includes a unique code to access over an hour of additional video content online (yes, you can watch them on your iPad too). It’s sure to give you new ideas on how to take better notes and communicate visually.

Mike Rohde did the illustrations for the book Rework (another excellent read). He also started a website called Sketchnote Army, which has tons more examples of Sketchnotes. Well worth checking out.

Using Icons in Your Visual Vocabulary

by qrayon 3. May 2013 17:32

Inkflow banner 325x50

One of the benefits of freeform digital note-taking tools such as Inkflow is that they allow you to easily mix left-brain thinking (words) with right-brain thinking (pictures). Pictures have actually been a part of written language for a long time. Billions of people write using languages derived from pictographs (e.g. Chinese or Korean); what we would call icons today.

The benefit of icons is that they allow you to compress a lot of meaning and even emotion into a simple picture. You don’t need any artistic skill to use icons effectively.

Building your own Icon Alphabet

By developing a set of icons to use in your own notes, you can more quickly capture and combine key ideas. The trick is to come up with icons for concepts that you use frequently. Here’s how to get started and build your icon vocabulary over time:


1. Look at your general shorthand

Guess what, you already use icons everyday: Think of all the shorthand you use, such as checkmarks, stars, and arrows. The cool thing is that these icons are re-usable. E.g. a star can represent a favorite item, or an important point, or well, a star.

You can easily customize these icons with your own special meaning. For example, you might draw a circle around a checkmark, and use that icon to represent important new ideas that you learned.

Common glyphs


2. Think about common concepts

The next set of icons that you might look at developing are for common, everyday concepts. Things like “Home”, “The World”, times of day, or places such as “cities” or “schools”:

Common concepts

You’ll find that using these simple icons in place of words much more evocative. They are especially useful as titles or to headline groups of ideas.


3. Create domain-specific icons

Finally, think about the major concepts that you frequently use in your field of work, especially the more complex ones. For example, you could represent “The Environment” with a tree. You can also reuse your icons. E.g. Use the city icon to also represent a business or corporation:

Domain specific concepts

When you iconize concepts this way, you’ll find that it’s easier to think of them as distinct entities or actors. This makes mapping out the relations between entities easier and more engaging. For example, you could use a set of icons to map out the interplay between governments, businesses, and the environment. This is useful both when brainstorming, and for communicating complex concepts to others.


Whole Brain Thinking

Icons not only help you capture ideas faster, but think better too, because you are working with a richer set of meaning, and engaging both sides of your brain at the same time. You will notice a difference in how your brain processes concepts represented by icons vs. just words. The thing is, you don’t need to pick one over the other. You can combine both to think more effectively.

What other ways have you found to leverage icons effectively? Love to hear your comments. Feel free to leave them below or send feedback.

WWDC 2013: Is Thin Now In?

by qrayon 30. April 2013 12:31

wwdc13

Apple’s WWDC 2013 logo has intensified the speculation about the new look of iOS 7. It sports a rail-thin font above what look like flat-colored App icons wriggling around.

For months, the rumor mill has been predicting a dramatic move to so-called flat design for iOS, similar to that Microsoft did with Metro. Like every other App developer, we have been playing around with flat design for our future interface language, particularly in the use of thin fonts. Here are some findings:

1. It’s all about the Retinas

The Retina display is what makes thin font designs possible. Take a look at a light vs. regular variant of a font sized for a non-retina display:

Light vs. Regular Font

Notice how faint and blurry the light version looks. However, when it is pixel doubled for a retina display, the same font looks gorgeous:

Light font retina

The lesson here is that App developers will need to programmatically switch between retina and non-retina versions of their text-based UI to maintain a good experience on non-Retina devices, at least until the iPad Mini gets it’s Retina upgrade.

2. Text can be better than icons

When your text labels look this good, they can start replacing icons for controls. Here’s the problem with icons: They are different in different Apps. Users need to re-learn and associate the meaning of every new icon they see with common functions. This results in a steeper learning curve. Through years of training, we are actually remarkably fast at recognizing words. Certainly faster than trying to guess the meaning of a new icon.

The other benefit of text is that they can also easily fade into the background and aren’t as distracting as a row of colorful icons. Think of the menu bars used for years on your desktop OS. This allows us App designers to intentionally add more conspicuous UI elements that can pop out without being overly garish themselves.

3. A flat interface enhances content

For those of us who build creativity Apps, having a flat design competes less with your content. The effect is quite remarkable, as it lets your content take center stage. There’s a reason why most photo Apps already tend to adopt a dark and non-descript UI. This lets users focus on what they should be focusing on: Making their content look great.

This move away from skeuomorphism also lets Apps be more authentically digital. UI doesn’t have to be constrained by arbitrary “real-world” limitations. A classic example: When you try to make the pages in a digital notebook look like a real paper book, it becomes a very messy operation to do “non-real-world” things like insert a new page in the middle, or duplicate a page.

Hopefully, Apple will take this opportunity to lead the rest of us with their own authentically digital designs. What do you guys think? Is everyone looking forward to a big refresh?

Tags:

Design

Powered by BlogEngine.NET 1.6.1.0 - based on Old School Theme by n3o Web Designers