 Vittle User's Guide
Looking for a crash course in Vittle?
Check out this 7 minute tutorial by BOGOBiology.
Thanks for downloading Vittle!
There are a lot of powerful features to discover.
Don't worry about learning everything right away.
Bookmark this page to refer to as you use Vittle more.
Make sure to check out examples of what folks are doing with Vittle on the web.
This Guide covers the features found in the Full and Pro Editions of Vittle. Most of the basic features are the same in the Free Edition.
Microphone Permissions
When you record for the very first time, you will be prompted to allow access to the Microphone.
Please enable this, then tap Record again to start your recording.
This may also result in an additional zero-length scene being created at the beginning. You can safely delete this in the Scene Editor.
If you accidentally tapped "Don't Allow", open the Settings App to Privacy \ Microphone and turn this on for Vittle.
It is important to enable this to record correctly.
If you wish to mute the mic, there is a setting in the Info menu.
The Gallery Full Edition
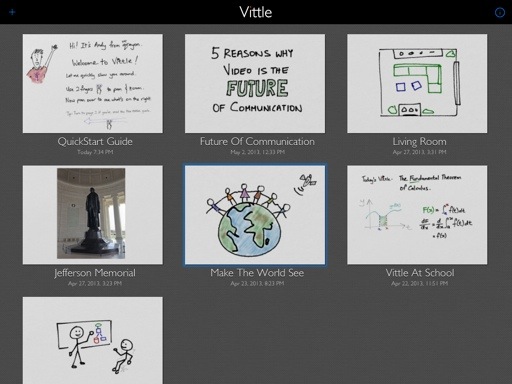
The Gallery shows your collection of Vittles.
Each Vittle contains the project files and the videos that are recorded.
Tap '+' in the upper left to add a new Vittle.
Tap on the thumbnail to open it.
Deleting & Renaming:
Tap on the Vittle's name to rename, duplicate, or delete it.
Search:
By default, the most recently edited Vittle shows up at the top.
Scroll past the top of the page to see the search and sort buttons.
Enter text into the search box to filter Vittles by parts of their names.
Tip: Add a mnemonic or tag to your Vittle names (e.g. "HST302 The Renaissance") to easily categorize and manage large numbers of Vittles by searching for the tags.
Tap the info icon in the top right to show the info dialog with links to the Online Guide and Email feedback dialog.
Navigation, Writing and Drawing

Scrolling toolbar:
The whole toolbar is visible on the iPad when in landscape.
When using it in portrait or split-screen, scroll the toolbar to access additional controls.
Zooming and Panning:
A key feature of the Inkflow Engine that Vittle uses is that you can always zoom and pan using two fingers.
The view starts off centered on the canvas, which is exactly 4 times larger than the visible screen.
This gives you a lot of room to work.
It's easy to move things around and resize them, so you can start anywhere.
Drawing:
Select the Draw button at the far left to enter drawing mode.
Draw using one finger.
Zoom in to write more finely or to add detail.
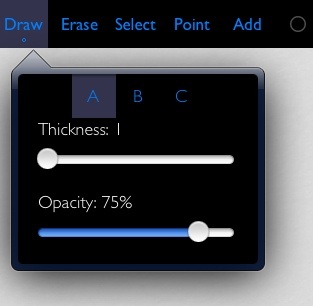
Full Edition
Tap the Draw button when it is already selected to see the Pen Thickness and Opacity settings.
There are three presets you can customize.
Tip: The small circle below a button title indicates there are additional options.
Change the opacity to a low value (e.g. 10%) for a pencil-like effect.
A low opacity + large thickness gives a color-pencil or brush effect.
Pencil-Only Drawing Mode:
If you have an iPad Pro with the Apple Pencil, you can toggle on the Pencil-Only Drawing Mode using the Pencil button at the lower left.
When activated, only the Apple Pencil can be used to draw, so no more stray marks. You can continue to use your fingers to zoom, pan, or select.
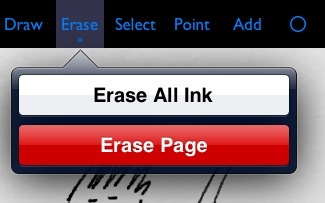
Erasing Ink:
Tap the Erase button to enter erase mode.
Tap and Hold the Erase button to see options to Erase the whole page.
Full Edition
Tap the Point button to enter the laser pointer mode. A red pointer will appear wherever you point with one finger.
Basic Recording
The Recording controls are on the right side of the toolbar.
They work just like your VCR:
Tap Rec to start recording.
Everything on the visible canvas is recorded, in sync with your voice.
Tap Pause to momentarily pause the recording.
This is useful to skip some drawing time.
You can also use it to produce stop-motion effects.
Tap Stop to (you guessed it) stop recording.
You can then tap View to review your Vittle.
Full Edition
In the Full Edition, each time you record, a new scene is added to the end.
The individual scenes can be later rearranged or deleted in the Scene Editor.
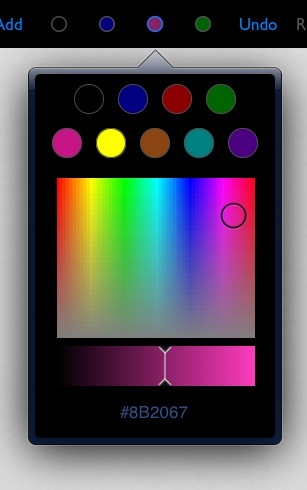
Colors
Tap on any of the four round color wells to change the ink color.
Full Edition
Tap on the selected color well again to open the color customizer.
Pick from one of the presets, or make any color you want.
Tip: Tap on the #RGB value to enter it directly.
Photos and Images
On an iPad, tap the Add button, then select "Add Photo" to select a photo from your albums.
On an iPhone, enter Select mode, tap on an empty part of the canvas, then tap "Add Picture".
Alternatively, while in Select mode, tap on the empty canvas, then tap "Add Picture" in the context menu.
Tip: If you had denied access to photos the first time, you can re-enable it by going to the iOS Settings App -> Privacy -> Photos, and turning the setting on for Vittle.
Full Edition
You can also copy images from external Apps such as Dropbox or Mail.
Simply copy the image from that App, switch to Vittle, then paste it in.
Selecting and Transforming
Selecting:
Tap on the Select button to enter selection mode.
Drag your finger around the ink you want to select. Zoom in if you need finer control.
Once selected, drag the selection to move ink around.
To delete ink, tap inside the selection, then tap delete.
This is pretty handy when you're using different colors to denote multiple layers of a diagram.
Tip: Tap on the canvas and tap “Select All” followed by Color Separation to quickly select all ink of a particular color.
Resizing Ink:
Drag the resize icon at the bottom right of the selection to resize the selected ink.
Drag it off the diagonal to skew and stretch the ink.
Tip: Use resizing and zoom to control the fineness of your ink. Write in full-screen zoom then shrink for finer lines.
For thicker lines, just do the reverse: Zoom in, write, then enlarge the ink.
Rotating Ink:
Drag the circular rotate icon at the top of the selection to rotate the selected ink.
Resize and Rotate Simultaneously:
Use two fingers on the selection to resize and rotate ink at the same time.
Cut, Copy, & Paste:
You can also cut or copy the selection from the context menu.
Once copied, tap anywhere on the un-selected canvas to paste.
You can use this to copy ink to different pages or projects.
You can even copy ink and images from Inkflow into Vittle.
Pro Edition Flip Ink: Tap on selected ink and select Flip Ink to flip it horizontally.
Pro Edition
Color Separation (iPad):
Right after you lasso select ink, the Color Separation panel will appear in the lower left.
Tap on individual color(s) to include in the selection.
Now, further operations such as moving or resizing will only affect the selected colors.
Pages Full Edition
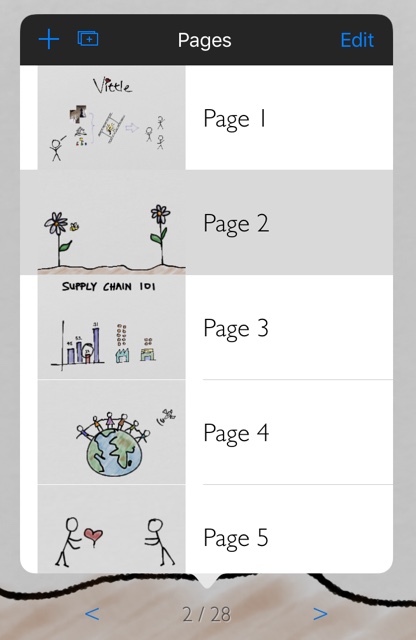
Paging:
Tap on the left and right arrow buttons besides the page number at the bottom of the screen to flip between pages.
Paging past the last page automatically adds a new page.
Page management:
Tap on the page number to bring up the page management tools.
Page management toolbar:
- Tap + to insert a page
- Tap the page duplicate button to duplicate the current page
- Swipe a row, or tap Edit then - to delete a page
Wrist Guard Full Edition
Tap the gray tab at the bottom right of the screen to call up the wrist guard. Drag it up and down to adjust.
Rest your wrist on this area while doing a lot of writing to avoid creating stray marks.
Image Operations Full Edition
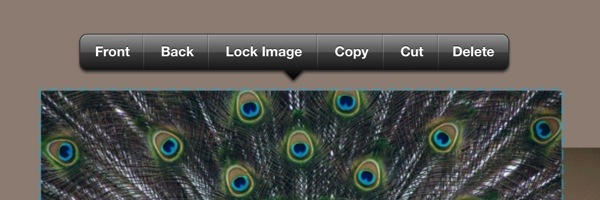
In Select mode, tap on a picture to select it, then tap on it again to bring up the image context menu.
Back and Front: Tap the Back or Front context menu options to move the image backwards or forwards relative to other images.
Ink always appears above any images.
Locking Images:
Tap Lock Image to lock it. The image now can no longer be selected. This is very useful to use images as backgrounds for the page or parts of it.
For example, you can add a picture of a grid or custom stationery and lock it in place. You can now add other images and move them around without affecting the locked background.
To unlock a locked image, just tap on it again and select unlock Image.
Text
Pro Edition
Tap the Add button, then select "Add Text" to enter typed text. Alternatively, enter Selection mode, tap on the canvas, then tap "Add Text" in the context menu.
Text is resized and positioned just like photos. To edit existing text, first select it, tap on the selected text and pick "Edit Text" from the context menu.
Camera Lock Pro Edition
The Camera Lock is a powerful and flexible tool that allows you to achieve many different effects.
The basic operation is simple:
Tap the Lock button to lock the camera's view on the currently visible part of the canvas.
This is indicated by a green frame.
From this point on, the camera only records what's in that frame, even if you zoom and pan elsewhere on the same page.
Tapping Unlock while recording will smoothly pan the camera's view back to the currently visible canvas.
One way to use this is to lock the camera while zoomed out, then zoom in to write more finely. Your audience can keep their attention on the big picture, while you fill in small details.
Another common use is to smoothly steer your audience's attention to different parts of the page.
For example, navigating from one key point to another,
or zooming out quickly to show them the big picture.
Another useful technique is to prepare illustrations outside of the camera's view, then move them into frame.
This is like moving different actors or props onto a stage, and is an effective storytelling technique.
Tap and hold the Lock button to reveal additional operations:
- Reset View: Resets the current page's view to the center.
- Zoom to Lock: Changes the current visible canvas to the active camera lock frame.
- Lock on Background: Locks the camera to include all locked images. Very handy for imported presentations.
- Re-Lock Camera: Restores the camera lock to the last locked frame.
Tip: Each page remembers its last camera lock frame, allowing you to Re-Lock the camera to it in order to continue scenes seamlessly.
You can duplicate a page to copy its contents as well as its last camera lock information.
Take your time to play around with the camera lock. You'll find that you can create pretty sophisticated effects, and tell a more engaging story with it.
Here's a more detailed walk-through of the Camera Lock feature.
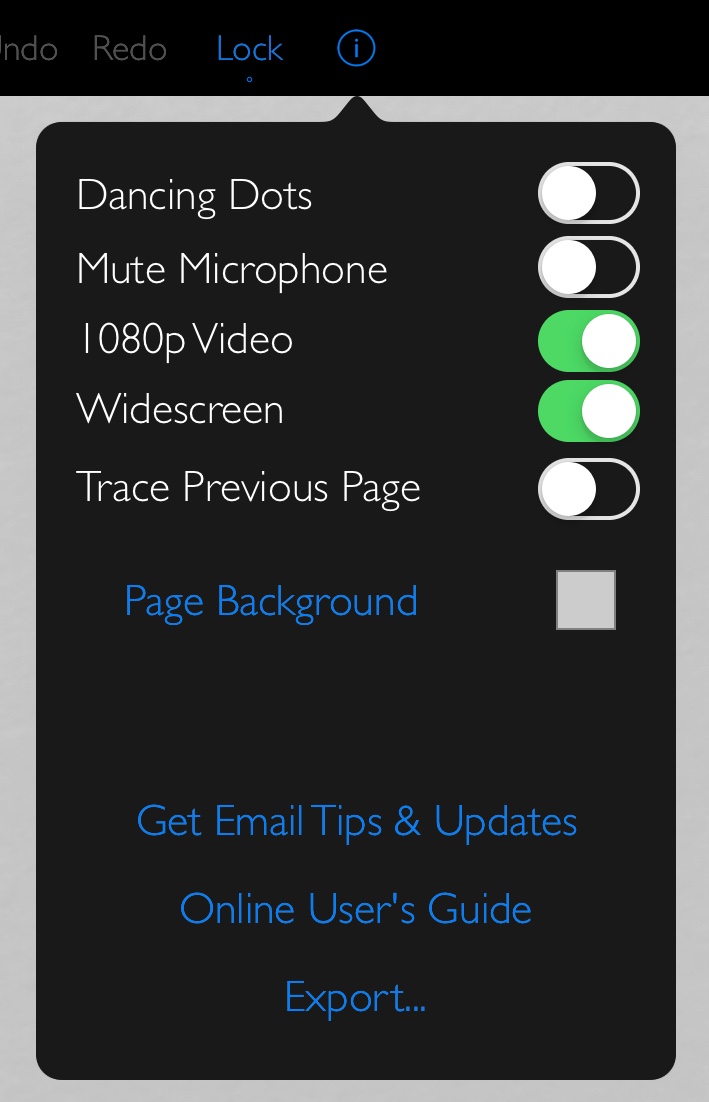
Editor Options
Tap the info button (the 'i' in the circle) to change the Editor options.
Dancing Dots: Turn on the Dancing Dots effect to give your drawings an element of liveliness, even when nothing is changing on the screen.
Mute Microphone: Sometimes, you may want to record scenes without sound. This is the control that let's you do that.
Pro Edition
1080p Video: By default, Vittle Pro records at a high 1080p resolution. Turn this setting off to produce 720p videos.
This will result in smaller files at the expense of lower resolution.
Pro Edition
Widescreen: Because the iPad screen is narrower than a standard widescreen video, additional content will appear at the sides of the video in widerscreen mode.
Turn this setting off to produce "pillar-boxed" videos instead where the sides are blacked out.
Pro Edition
Trace Previous Page: Enable this to see a faint outline of the previous page (which won't be recorded).
One way to use this is to prepare a template or guide ahead of time, then do the actual live recording on the next page.
Pro Edition
Export: Save your projects as multi-page PDFs, or the current page as a JPEG.
Tip: To record an imported widescreen presentation, turn on this setting, then tap-and-hold on the Lock button and select Lock on Background.
This will fix the camera on the imported slides.
Get Email Tips: We send out an Email newsletter every couple months or so with tips and tricks, as well as pointers to new tutorials, new Apps and advanced techniques.
Don't worry, we hate spam as much as you. Your email is only used for this newsletter and is never sold to third parties.
You can unsubscribe anytime by emailing us again.
The Scene Editor Full Edition
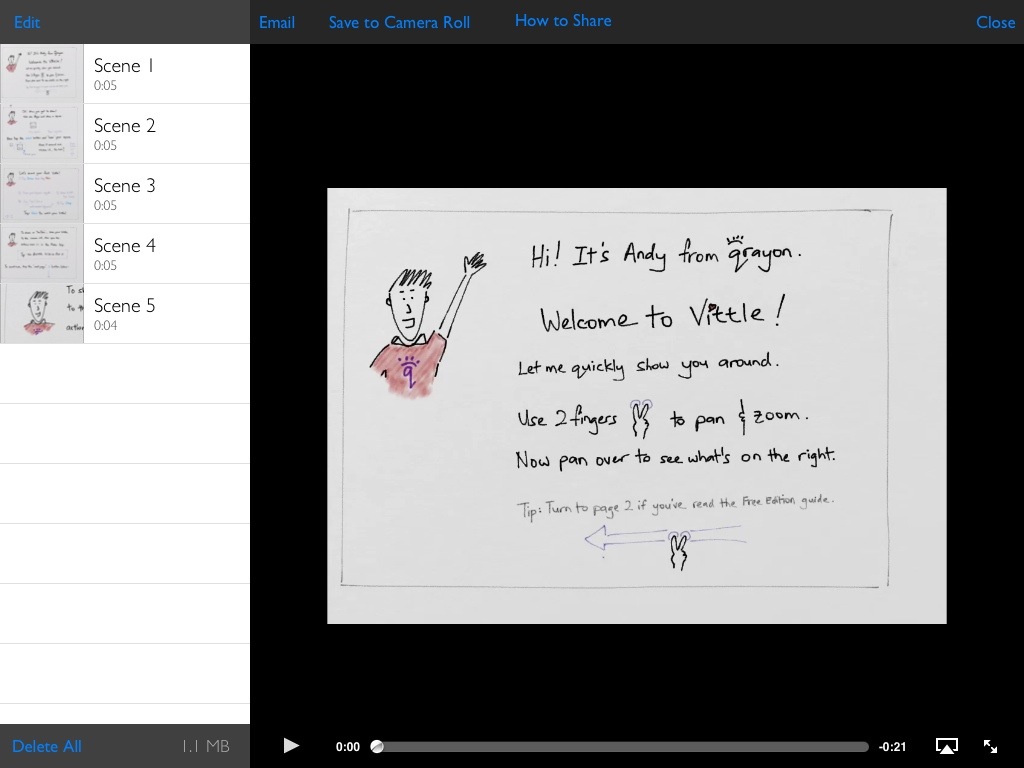
Tap the View button to open the Scene Editor.
Pro Edition
Video Speed: Tap it to boost the video speed by 25%, 35%, 50%, or 100%.
Add a slight speed boost to give an extra little pep to longer presentations or lectures.
This setting is sticky, but doesn't change the source video, so you can change it as often as you like.
Tap Edit to change the order of scenes and delete individual scenes.
You can also swipe across a scene to delete it.
From here, you can also email your complete video, or save it to the camera roll.
Sharing your Videos
Share on YouTube: Use the YouTube App to upload your videos.
First save your video to the camera roll, switch to the YouTube App, tap on the camera button and select your video from the gallery.
Find more details on this YouTube support page.
Share on Vimeo: Vimeo is another video service that we love.
To upload to Vimeo directly from your iPad, download the Vimeo App from the App Store, and use it to upload saved videos from your camera roll.
Sign into Vimeo in the Settings App, then upload directly to Vimeo from the Photos browser.

Share on Facebook: Similarly, to share your video on Facebook, first save it to your camera roll.
Now open the Facebook App, tap the Photo button, and select your saved video.
Sign into Facebook in the Settings App, then upload directly to Facebook from the Photos browser.
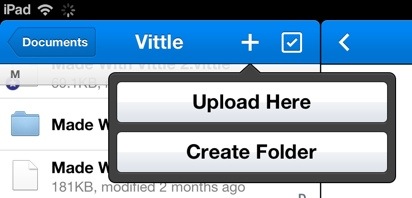
Share on Dropbox: You can also use Dropbox's iPad App to upload videos directly from your camara roll.
After saving your video to the camera roll, open the Dropbox App.
Navigate to the location within your Dropbox where you would like to put these files,
then tap the + menu button in the top-right corner of the screen and choose Upload here.
You can find more details on Dropbox's site.
Twitter: Once you've uploaded your video to YouTube or Vimeo, tweet the link to your followers.
Share on your company server: You have full control over the Vittle video files that are generated.
You can upload them to the server or service of your choice either directly from your iPad, or by first copying them to your PC or Mac.
Editing and Enhancing your Videos
While Vittle includes all you need to record and make basic edits to you videos, sometimes you want to go the extra mile.
Both YouTube and Vimeo now support adding music soundtracks to your uploaded videos and applying visual filters.
Check out the "Enhancements" setting in these services for more information.
For more control, you can edit your completed videos in a third party App such as iMovie.
With iMovie, you can re-cut your scenes, add theme music, and apply other visual effects.
Importing PDFs Pro Edition
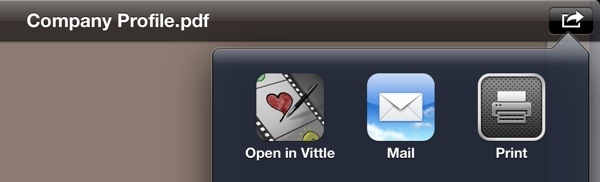
You can open PDFs in Vittle Pro from Mail or third party Apps.
When viewing the PDF, tap the "Open in..." button and select "Open in Vittle".
You may have to scroll the list of options to find Vittle Pro in the list.
This will create a new Vittle project with an image of each page of the PDF.
These images are locked by default, but you can tap on them in Select mode to unlock and reposition them.
You will typically want to import PDFs that are generated by a presentaion App such as Keynote or PowerPoint.
The landscape orientation works best with Vittle.
Tip: If you have an oddly-sized or very detailed PDF, a useful tip is to first import it into your presentation App,
rearrange and resize the pages to fit your presentation, then export that deck to a PDF into Vittle Pro.
Importing Keynote Decks Directly Pro Edition
You can even open PDF decks directly from Keynote for the iPad:
- In Keynote, tap the "..." button in the top right and select "Send a Copy".
- Select the PDF format.
- Select "Choose how to send" if the menu doesn't appear.
- Scroll the list and select "Open in Vittle Pro".
- Tip: You can tap and hold to rearrange the apps in the list.
Transferring projects from Vittle to Vittle Pro
You can use iTunes File Sharing to transfer files across editions:
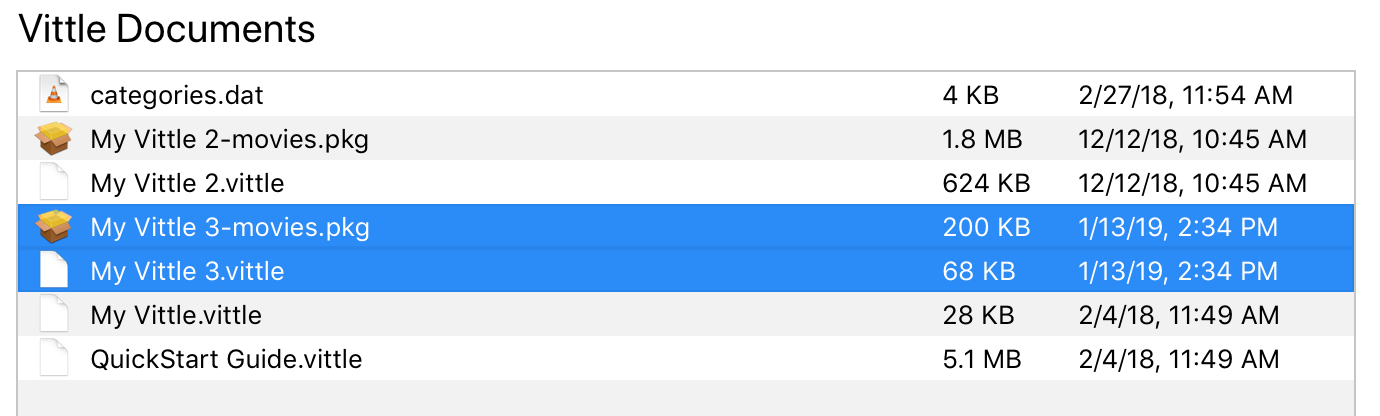
- Connect your iPad to your PC / Mac and open iTunes
- Select the iPad and open "File Sharing", scroll down and select "Vittle"
-
Each project has up to 2 files:
[Project name].vittle
[Project name]-movies.pkg
- Drag (copy) each set to your desktop
- Select "Vittle Pro" in the iTunes File Sharing list
- Drag the files back from the desktop to iTunes
More Tips and Tricks
This covers just the basics of what you can do with Vittle.
We publish advanced tutorials from time to time on our blog and email newsletter.
Sign up for it here.
To start with, here are three simple ways to practice telling stories using Vittle.
Examples of Videos Made with Vittle
Here are a couple of great examples of Vittle being used to flip classrooms and present rich content:
![[Twitter]](../art/t_small-a.png) Follow us on Twitter to be the first to hear about new Apps and get FUN (+free) stuff just for fans
Follow us on Twitter to be the first to hear about new Apps and get FUN (+free) stuff just for fans.
More Goodness
If you like Vittle, also check out Air Sketch: Turn your iPad into a wireless whiteboard.

Back to the Vittle homepage.